Square Foot Garden Grid Hack
Hey guys, this post will be short and sweet… just like the DIY project I’m about to share 😊 As you know, I’m all about following the Square Foot Gardening method and a BIG component of the process is squaring off your garden into 1-foot grids. The book (and the traditional way to do this) recommends to nail down lattices and create a wooden tic-tac-toe fixture on top of your box.

I LOVE the look of this and it was actually my original plan. I went out and purchased the wood to do just that. It’s actually still sitting in my garage…
However, there is another way to create your square foot garden grids!
However, my husband convinced me to go with the nail and yarn method because:
- It’s easier to replace
- It gives you a little more space within the grid (not much, but hey it’s a bit more wiggle room)
- Allows for more flexibility… for whatever reason it seems more forgiving if some veggies decide to go rogue and grow into their neighbor’s space
I didn’t have strong enough reasons to push for the lattice, so I agreed to move forward with this way. I also have a grand plan to re-purpose the lattice wood we bought to build DIY trellis fixtures in the back to support my tomatoes. Hopefully it’s a win-win situation.
When to add your square foot garden grids
It’s always best to create your grids right after you fill it up with soil and BEFORE you plant anything. However, in my situation, I had started seeds in an indoor kit and desperately needed to transfer them because they were growing too fast for my slow pace… I went ahead and mixed up my soil (see my Mel’s Mix post) and transfer-planted my little seedlings before mapping out my grids. I basically eyeballed where each “plot” and plant would sit and hoped for the best 😊 hahaha

This actually wasn’t as bad as it sounds because you aren’t putting much in each square foot. For example, just one tomato… just one dill… just one pepper, etc. I have noticed a bit of overgrowth with my radishes and carrots, as these allow for 16 seeds! But this doesn’t bother me at all and it will only get easier next time around because my yarn is up.
Here's What You Need:
- Your box
- Measuring tape
- Pencil
- Hammer
- 1 1/4 Wire Nails (quantity depends on the size of your box)
- Weatherproof yarn

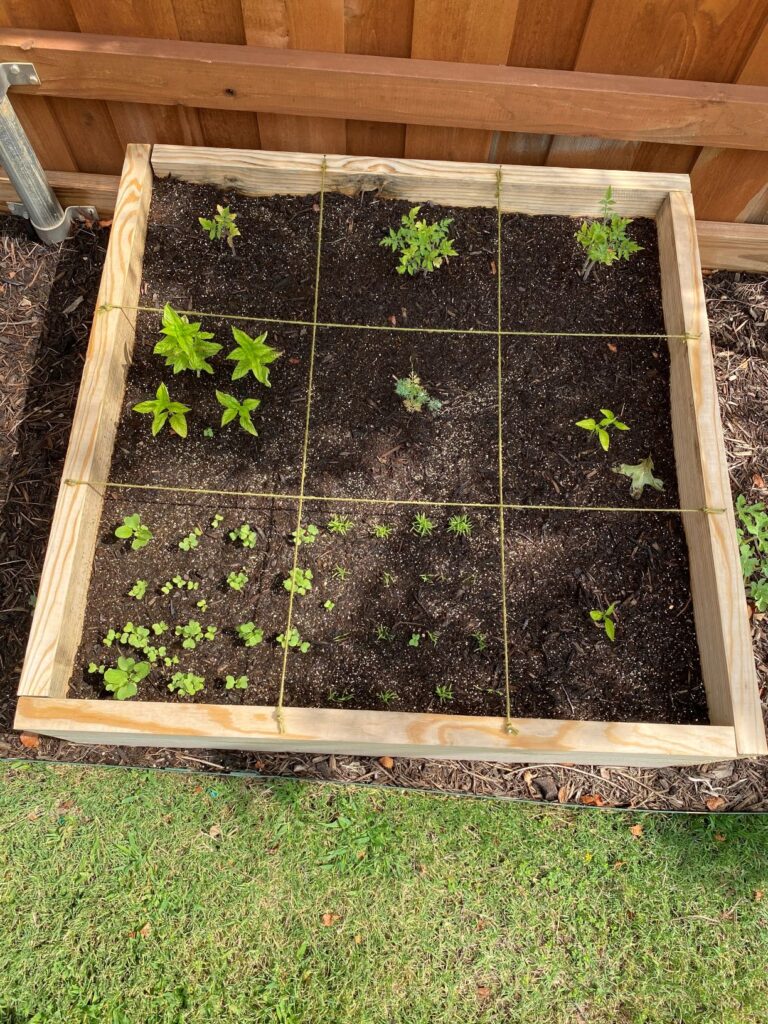
Then all you need to do is measure out the equal distance to give you the desired number of rows you want. Measure on the inside of your box, not the outside. For example, my child-size box will need THREE rows, so I need to make TWO points on each side of my box. If you were doing the traditional FOUR x FOUR Square Foot Garden (16 squares), then you would need to measure THREE points to give you those four rows, etc.
Once the spots are marked, hammer in your wire nails. Cut off enough string to tie opposite nail heads together and boom! Now you’ve created a quick and easy tic-tac-toe board out of yarn. This should last for 3-6 months – plenty of time to go through a harvesting cycle of your plant! Then you can easily re-do the process with fresh yarn and be good to go again.


I know this is pretty much common sense, but I wanted to share in case you were getting hung up on the grid portion of the square foot garden and were looking for an alternative way to mark off your spaces.